
Intro
Hi there, nice to see you 👋!
Last time we discussed about the hardware needed for building the cluster, its architecture and performed a rough cost estimation.
I assume that since you’re still reading, you’re ready to start building the cluster. So let’s actually start doing that!
This post is going to be more practical. I’ll explain how to bootstrap the Raspberry Pis as Kubernetes nodes and some utilities to help you with that.
Let’s dive in 🤿!
Kubernetes Specific Node Requirements
There are quite a few requirements to make a Linux machine into a Kubernetes node. The relevant documentation is pretty nice (see here).
A lot of these are usually available on a Linux system by default, so we’ll focus on the ones that need to be explicitly taken care of by us.
OS choice
We have a ton of options for operating systems. However, to avoid complicating things, I tried to find Linux distributions that already provide support for the Raspberry Pi 5.
The most obvious option would be Raspberry Pi OS. It’s the official Raspberry Pi Operating System, which means it supports the Pi’s hardware by default.
However, I’m already quite familiar with Ubuntu since I’ve been using it for quite a few years and since there’s a recent LTS version officially certified for Raspberry Pi 5, I leaned more towards that.
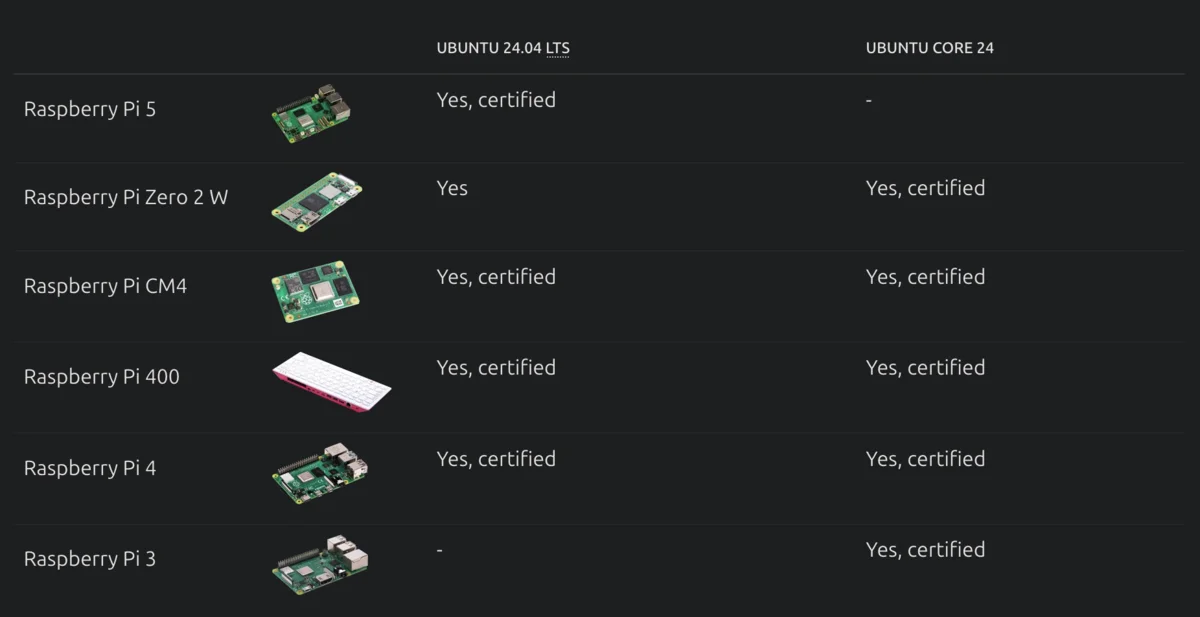
Ubuntu 24.04 LTS is certified for Raspberry Pi 5
The only issue I encountered while evaluating it was the absence of the iscsi_tcp module. By default it’s not installed, but that’s not hard to address, as seen below.
So finally, I opted in for Ubuntu Server LTS 24.04 for Raspberry Pi (download link, preinstalled image).
Packages / configuration
We’ll disable swap since Kubernetes requires it. There’s also a few required packages that’ll have to be installed, mainly Longhorn dependencies. Mainly these are:
python3-pipgitapt-transport-httpscurlavahi-daemonnfs-commonlinux-modules-extra-raspi
Now, while some of these aren’t expicitly required for Kubernetes (like git), they make node management easier.
Node Access & Networking
To safeguard the nodes, I decided to create 2 different accounts:
- one will allow password login, since I might lose SSH access for some reason and I’d like to plug a screen, mouse and keyboard on each node and have access. Users won’t be allowed to SSH as this account, to prevent bruteforce attacks.
- another account with SSH enabled, which will authenticate using a public key. This one won’t have a password set.
I also ensured the nodes have consecutive static IP addresses (e.g. 192.168.2.1, 192.168.2.2 etc), predictable hostnames (e.g. rpi01-ubuntupi) and installed Avahi mDNS to access them via their .local DNS alias. While these aren’t Kubernetes requirements (except for the static IPs) they simplify administration by a lot.
Partitions
Having separate partitions isn’t strictly required. However, it’s a good practice, especially since these nodes will provide persistent storage. If persistent storage grows uncontrollably, it might cause disk pressure on the node and this might cause it to misbehave (e.g. Kubernetes could start killing pods because of it).
By creating an additional partition and using only that for persistent storage we can avoid this scenario.
There are a few other cases where things like that could happen, e.g. from log files growing uncontrollably, but these are more rare and I didn’t want to create a partition for that as well.
The preinstalled Ubuntu Server image we’ll be using already creates two partitions (one mounted at /boot/firmware and another one at /), so we’ll actually create a third one. Our disk will look something like this:
$ lsblk /dev/nvme0n1
NAME        MAJ:MIN RM   SIZE RO TYPE MOUNTPOINTS
nvme0n1     259:0    0 465.8G  0 disk
├─nvme0n1p1 259:1    0   512M  0 part /boot/firmware
├─nvme0n1p2 259:2    0   125G  0 part /
└─nvme0n1p3 259:3    0 340.3G  0 part /mnt/data
Booting from NVMe disks
If you Google that, you’ll see a ton of guides explaining how to make the Pi 5 boot from NVMe disks. However, in my case, it booted by default. Looks like my Raspberry Pis had this option enabled from the start, most likely they’re being shipped with a newer firmware. If, however, yours don’t boot from NVMe by default, here’s the official guide on configuring NVMe boot from the Raspberry Pi Documentation.
NVMe (Non-Volatile Memory express) is a standard for external storage access over a PCIe bus. You can connect NVMe drives via the PCIe slot on a Compute Module 4 (CM4) IO board or Raspberry Pi 5. With some additional configuration, you can boot from an NVMe drive.
cmdline.txt and config.txt
These two are configuration files we need to modify, each one for different reasons.
About cmdline.txt

The cmdline.txt file is a configuration file, located in the boot partition of the SD card on Raspberry Pi, and used to pass additional parameters to the Linux Kernel for the system boot.
Here, what’s important is:
net.ifnames=0: Disables the predictable network interface names feature, which assigns names likeenp0s3instead of the traditionaleth0. By setting this option to 0, it ensures that network interfaces are named using the old style (eth0,wlan0, etc.). While technically this is not required, I opted for it because I’m used to such naming conventions.root=LABEL=writable: This specifies the root filesystem that the kernel should mount during boot. In this case, it’s referring to a partition labeled “writable.” This label exists by default on the 2nd partition that exists in the preinstalled Ubuntu image we’re using, and it’s easier than setting partition UUIDs here explicitly.
Additionally, quoting from Kubernetes Documentation
On Linux, control groups constrain resources that are allocated to processes. The kubelet and the underlying container runtime need to interface with cgroups to enforce resource management for pods and containers which includes cpu/memory requests and limits for containerized workloads.
So we’ll also need to enable:
cgroup_enable=cpuset: Enables the cpuset controller within cgroups. The cpuset controller allows assigning specific CPUs to specific containers. Kubernetes uses this feature to ensure that containers can be allocated to specific CPUs, allowing for better control over CPU resource allocation and scheduling.cgroup_enable=memory: Enables the memory controller within cgroups. The memory controller is responsible for tracking and limiting memory usage of processes. Kubernetes uses this to ensure that each container stays within its defined memory limits and doesn’t consume more memory than allocated.cgroup_memory=1: This explicitly enables memory accounting in the cgroup memory controller. This ensures that the memory usage of all processes and containers is accurately tracked and managed. Memory accounting is crucial for Kubernetes to enforce memory limits and handle memory-related events (like OOM).
About config.txt
Instead of the BIOS found on a conventional PC, Raspberry Pi devices use a configuration file called
config.txt. The GPU readsconfig.txtbefore the Arm CPU and Linux initialise. Raspberry Pi OS looks for this file in the boot partition, located at/boot/firmware/.
Here, we only need to focus on the PCI Express bus related settings. We want to enable the bus and also set it to Gen 3.0 speeds.
By default, the PCIe connector is not enabled unless connected to a HAT+ device. To enable the connector, add the following line to
/boot/firmware/config.txt:
dtparam=pciex1The connection is certified for Gen 2.0 speeds (5 GT/sec), but you can force Gen 3.0 (10 GT/sec) speeds. To enable PCIe Gen 3.0 speeds, add the following line to
/boot/firmware/config.txt:
dtparam=pciex1_gen=3
So, we’ll do just that.
Bootstrapping Process
We have various ways of doing all the above. The most straightforward one would be:
- using a USB NVMe enclosure to plug the NVMe drive
- formatting it / copying the image with the Raspberry Pi Imager
- readjusting partitions (shrinking the 2nd one, creating the 3rd)
- booting and configuring the node with all the above
However, that’s quite cumbersome. Things can slip and if you’re configuring multiple drives it’s a bit of a mess.
To streamline this, I’m happy to introduce you to my bootstrapping utility!
This is a set of interactive scripts (two in particular) that handle:
- copying the image to the NVMe drive
- creating the partition configuration we need
- copying
cloud-initconfiguration to configure access, networking & install required packages etc - modifying
config.txt/cmdline.txtas specified above.
With these scripts the process is quite simple:
- plug the NVMe drive
- run each script with the required parameters
- the disk is ready, eject and boot the Pi!
Let’s look into the scripts themselves.
Wait, what’s cloud-init?
From its docs
Cloud-init is the industry standard multi-distribution method for cross-platform cloud instance initialisation. It is supported across all major public cloud providers, provisioning systems for private cloud infrastructure, and bare-metal installations.
During boot, cloud-init identifies the cloud it is running on and initialises the system accordingly. Cloud instances will automatically be provisioned during first boot with networking, storage, SSH keys, packages and various other system aspects already configured.
Cloud-init provides the necessary glue between launching a cloud instance and connecting to it so that it works as expected.
In short, with cloud-init we can just add a script that runs on first boot and configures the node, leaving in a state where we can just SSH to it.
So we’ll use cloud-init to configure:
- networking (IPs, gateways, hostnames etc).
- users / SSH access like we described above (passwords, insert SSH public keys etc).
- install required packages to get to a state where the node is ready to install Kubernetes.
Preparation
Before running the script, we’ll need to set our desired configuration. Copy config.ini.sample into config.ini and set any of the options below under the [config_generator] section:
hostname_string="rpi{num}-ubuntupi": Change this to whatever you like. You need to include the{num}segment, as this will be used to interpolate the node’s numberremote_admin_acc_ssh_key: This is the public key of the remote user, the one we’ll use to SSH to the nodesremote_admin_acc_username: The username of the remote userlocal_admin_acc_username,local_admin_acc_password: The username / password of the local usergateway: Your gateway’s addresseth_network: The ethernet network (if you’re using ethernet)wifi_ssid,wifi_password,wifi_network: The WiFi network (If you’re using WiFi)
Example script execution.
Partition manager script
From the repo’s documentation:
partition_manager.py: Copies an image to an SD card or NVMe disk. Also, creates an additional partition to use as storage on the node, separate from the system partition
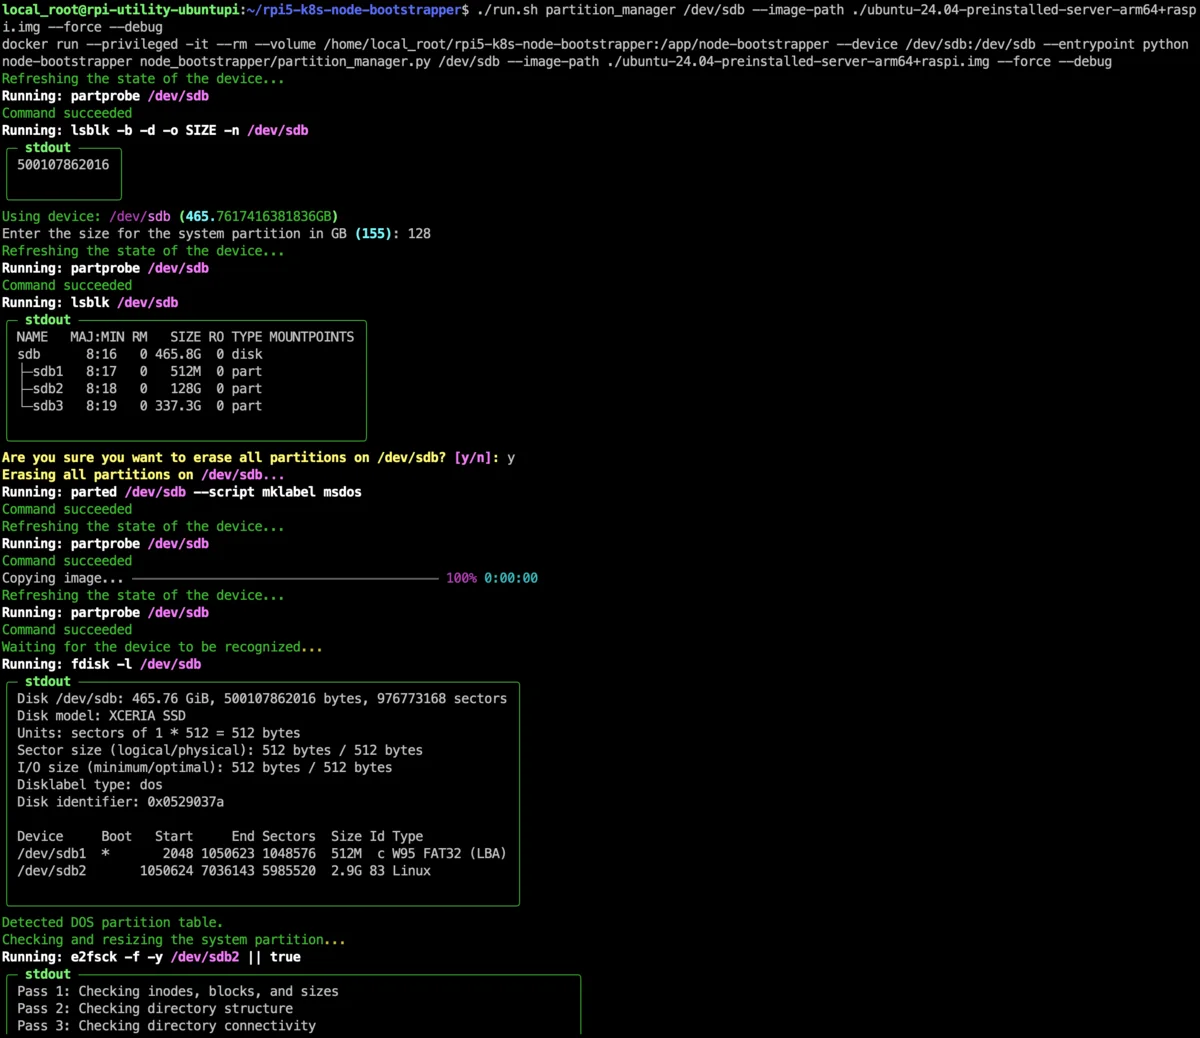
So, this is step 1. We plug the disk, identify it (e.g. /dev/sda) and run the script to copy the image / create partitions.
A few interesting options are:
--force: Without it, you won’t be able to overwrite a disk with an existing partition table. With it, you’ll still get a prompt to confirm if a partition table exists.--debug: Prints each command’s output in nicely formatted text. Useful to understand exactly what’s going on--help: Shows a prompt explaining all arguments
The command will also prompt for things like partition size etc.
An example execution would be:
# This will format /dev/sdX, flash the image & create an additional partition
./run.sh partition_manager /dev/sdX --image-path ./ubuntu-24.04-preinstalled-server-arm64+raspi.img --force --debug
Pay extra attention to the disk you use with the script!
If you choose the wrong disk you can mess your OS pretty badly! Make sure you’ve passed the correct disk, the one you want to use with your Pi. I like to double / triple check things before running, that’s why the script will also issue a warning if a non-empty disk is passed.
But in any case, be very cautious!
Config generator script
Again, from the repo’s docs:
config_generator.py: Generates cloud-init configuration, to help bootstrap the node on first execution. Also optionally copies this config in the boot partition.
Without removing the disk, we’ll run this script as well to generate cloud-init configuration and optionally copy it over to the disk as well (recommended).
Apart from the options above, you can also use:
--hosts-number: If you want to generate configuration for multiple hosts at once, set this to something greater than 1. If you do that, the script will generate directories for each node and will skip copying the files over to the NVMe disk.--offset 5: If you’re formatting each disk and generating config for each node together, this is useful. After the 1st node, set this to 1, 2, 3 etc to generate config for the 2nd, 3rd, 4rth node respectively. This mode will copy the config over as well.
Example executions:
# This will generate & copy cloud-init configuration. It'll generate static IP configuration for WiFi, but not for ethernet.
./run.sh config-generator /dev/sdX --no-setup-eth --setup-wifi --debug --hosts-number 1 --force

# This will do the same, but will generate ethernet configuration and think this is the 6th host, so it'll name it as rpi06-ubuntupi.local. You can change the name pattern in the config file.
./run.sh config_generator /dev/sdX --no-setup-wifi --setup-eth --debug --hosts-number 1 --force --offset 5
Result
Once you’ve done this, plug the NVMe disk into the Pi and let it run. It could take a few minutes, mine took around 5. Hopefully, if all goes well, you should be able to ping each node at {hostname}.local (or using its IP ofc) and SSH to it once cloud-init has finished.
If something goes wrong, you should be able to use the local account username / password to login to the Pi with a mouse / keyboard / screen. If that’s not working either, I’d make sure the Pi is booting from NVMe by flashing an SD card with and trying to boot from it.
Outro
Hopefully by now you’ll have your nodes ready to run Kubernetes!
In the next post we’ll use Ansible (kubespray) to install it and get our cluster going so feel free to subscribe below to stay in touch!
📣 Don’t be a stranger!
If you used my scripts above to setup your cluster, I’d like to hear from you!
❓Was it useful or not?
❓Did you face any issues?
Happy to hear your thoughts / feedback either in the comments or in any of my social channels.