Intro
Hi there, welcome 👋!
After the introductory post in the [rpi-k8s] series, it’s now time we start exploring how to actually build the cluster.
In this post, we’ll talk about our cluster’s hardware:
- each node’s hardware configuration
- which / how many Raspberry Pis are needed
- additional components required (for storage, cooling etc)
I’ll also provide an estimated cost & links (wherever possible).
Initially I wanted to explain how I 3d printed the rack-mount for the cluster and some additional components in this post as well. However, even without that, this post turned out quite lengthy, so I decided to split it into a future post.
Let’s get started!
Hardware and node configuration
Node hardware
Let’s see what kind of hardware is required for this and why.
Raspberry Pi configuration
To make the most out of our cluster and support meaningful workflows, we’ll need to use Raspberry Pi 5s with the maximum amount of RAM. The 5’s CPU offers a significant performance boost over the Pi 4. Its 8GB RAM version also gives us plenty of memory to work with which is crucial. Given that Kubernetes core components are pretty memory hungry, anything less would be insufficient, especially for control plane nodes.
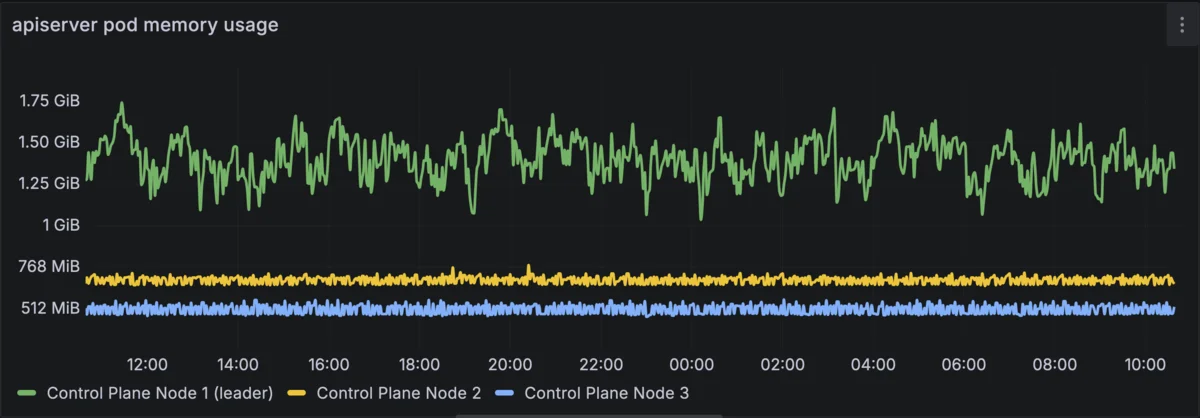
apiserver pod memory usage is close to 2GB on the leader, ~700MBs on every other control plane node.
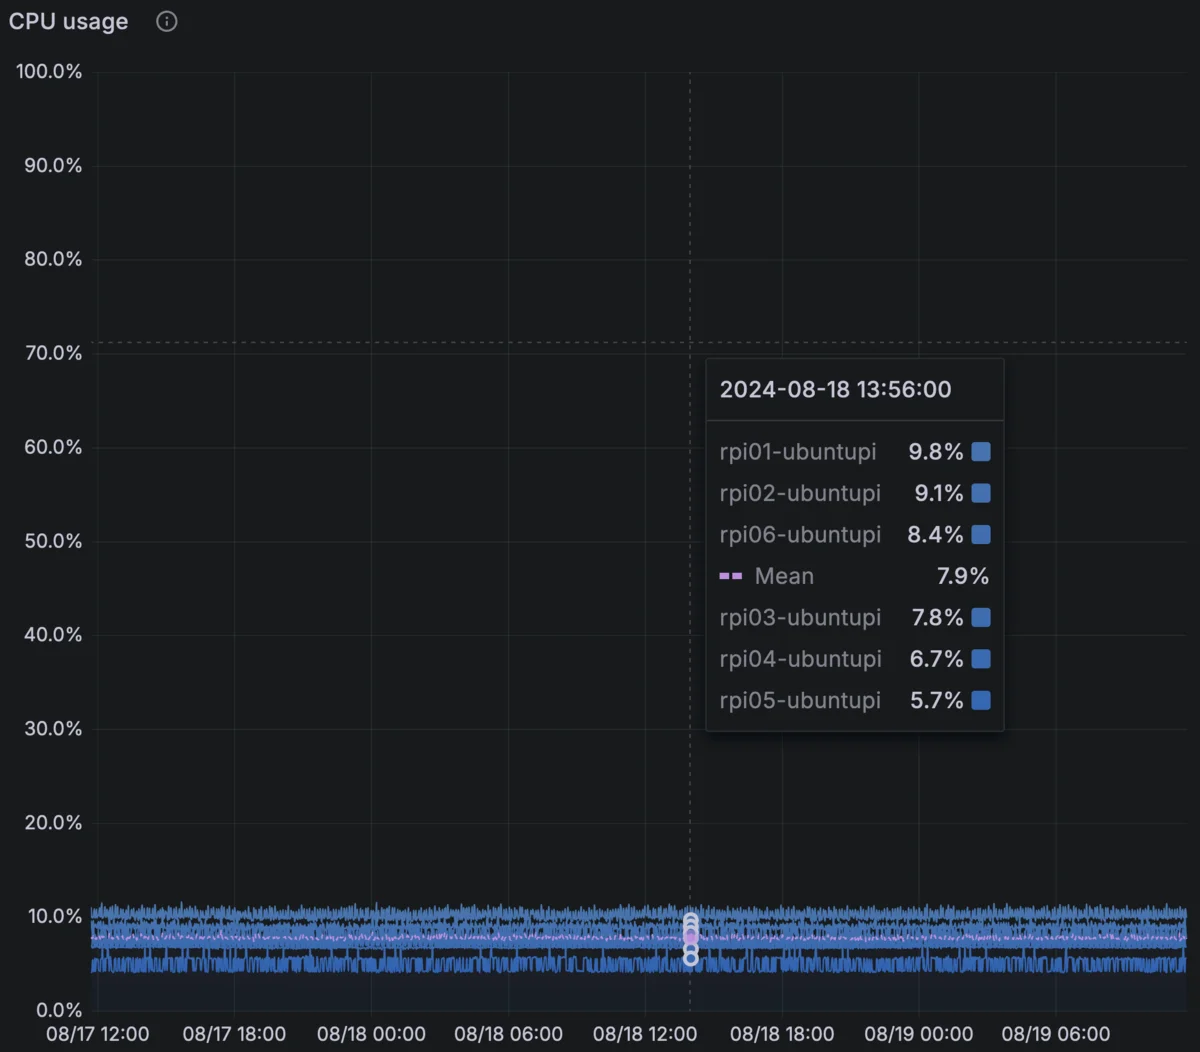
Average CPU utilization per node
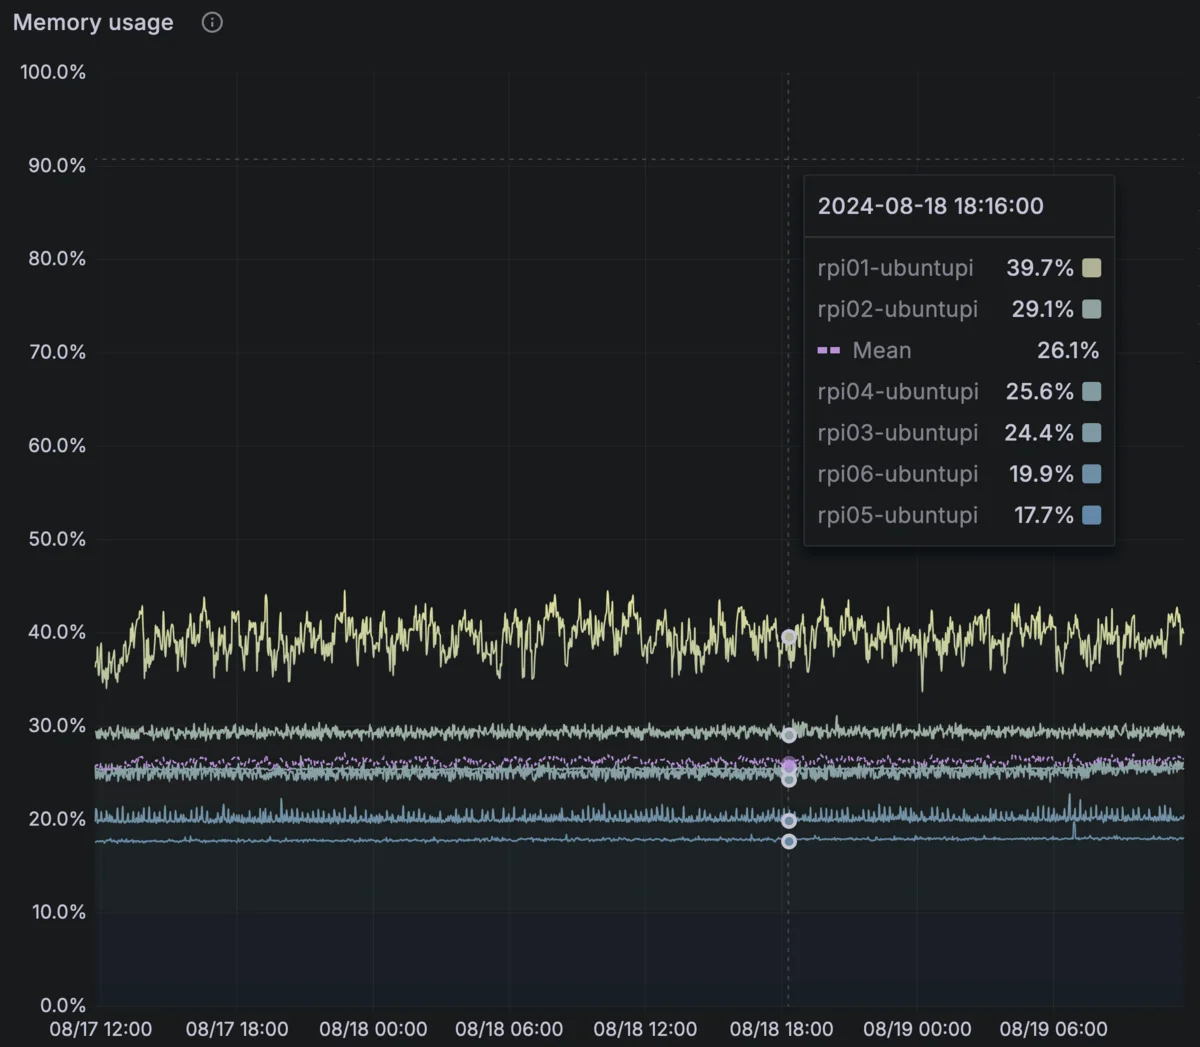
Average memory utilization per node
Storage
Traditionally the Pis used SD cards for storage. While this works, there are significant drawbacks like the reliability of SD cards (they tend to fail after some power cycles) and their very poor performance. Since the Pi 4 we’ve been able to boot from USB SSD disks, which is a significant improvement and a lot of Raspberry Pi Kubernetes clusters have been built using that as storage.
However, the Pi 5’s PCI express Gen 2.0 lane can unofficially achieve Gen 3.0 speeds. This gives us the opportunity to use NVMe storage, gaining a significant performance boost. Here’s the theoretical performance of the 3 storage methods compared:
| Metric | U3 V30 SD Card | NVMe SSD (USB 3.0) | NVMe SSD (PCIe 2.0 x1) | NVMe SSD (PCIe 3.0 x1) |
|---|---|---|---|---|
| Sequential Read | 90-100 MB/s | 400-500 MB/s | 400-500 MB/s | 900-1000 MB/s |
| Sequential Write | 60-90 MB/s | 400-500 MB/s | 400-500 MB/s | 900-1000 MB/s |
| Random Read IOPS | 1,500 - 3,000 IOPS | 20,000 - 50,000 IOPS | 50,000 - 100,000 IOPS | 400,000 - 600,000 IOPS |
| Random Write IOPS | 1,000 - 2,500 IOPS | 20,000 - 50,000 IOPS | 50,000 - 100,000 IOPS | 300,000 - 500,000 IOPS |
So using an NVMe drive especially in speeds that approach the PCIe Gen 3.0 bus speeds should offer a significant benefit, both for the OS and the node’s performance in general, but also for the performance of our storage intensive workflows.
About storage performance
Something that will become apparent below is that we’ll use two options for storage:
- a high performance one, which does not offer redundancy and doesn’t allow exchanging PVs between different nodes
- a lower performance, cloud-native & more reliable version which allows flexible cloud workflows but is significantly slower (at least given our hardware limitations).
Now, while we won’t be able to achieve the speeds above, our high-performance storage is able to get close enough and should be more than suitable for running our database workloads (which, for now, is the most storage demanding workflows we’ll need to run).
We’ll talk more about this in the storage related post, but here’s a benchmark sneak peek:
IOPS (Read/Write)
        Random:        147,728 / 101,610
    Sequential:         34,090 / 109,379

Bandwidth in KiB/sec (Read/Write)
        Random:        838,629 / 623,584
    Sequential:        845,459 / 700,666

Latency in ns (Read/Write)
        Random:         100,895 / 35,608
    Sequential:          37,713 / 32,655
NVMe HATs
To use PCIe NVMe storage for the Pis, we will rely on an NVMe HAT. HATs (Hardware Attached on Top) are a standard way of enhancing a Pi’s hardware and are often used for network expasion, providing PoE to the Pis and a bunch of other things.
To get a glimpse into what HATs can do, Jeff Geerling offers a very comprehensive list on his blog with quite a few examples.
There are quite a few NVMe HATs for storage. Each one offers different capabilities, from mounting position (top / bottom) to the possibility of mounting different format NVMe disks (2230, 2242, 2260, or 2280) or even two of them in some cases. Some even combine NVMe expansion with other expansion options, like AI chips or 2.5G network. While we could benefit from 2.5G network, most of the combined options (the ones that provide more than a single NVMe disk) limit the bus speed to Gen 2.0 speeds, which is a trade-off I wasn’t willing to make, especially for high-performance storage nodes.
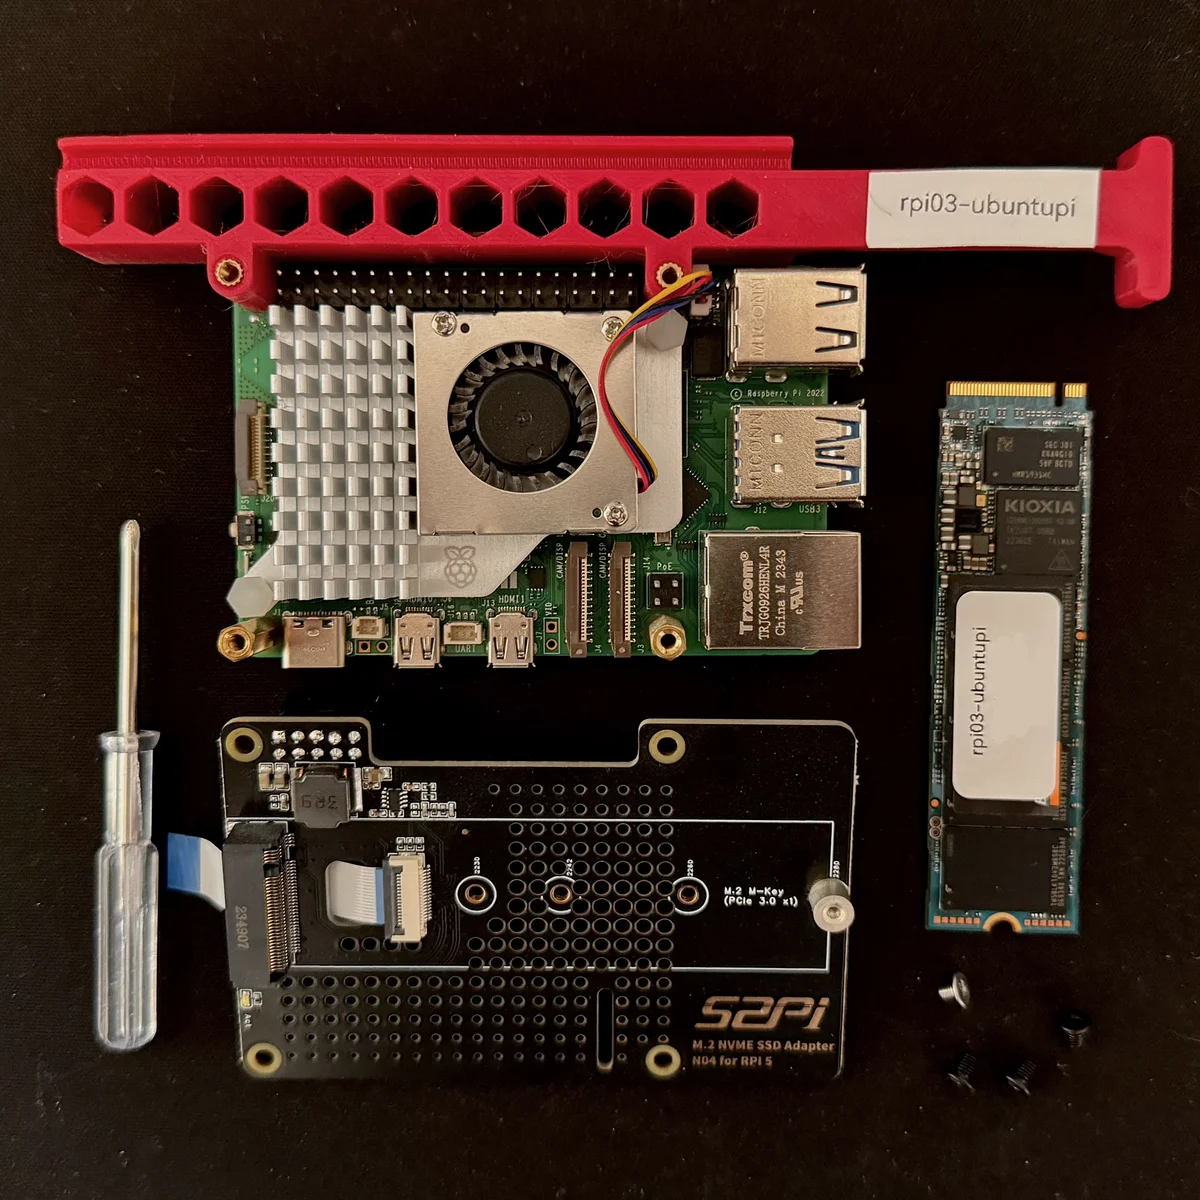
In my case, I chose the 52Pi N04 (Amazon.de, non-affiliate), for several reasons:
- it offers Gen 3.0 speeds.
- it supports the 2280 SSD format, which is widely used and makes it easier to find affordable NVMe drives.
- it is mounted on top, which makes it more compatible with my vertical rack holders.
The Gen 3.0 speed requirement is only relevant for the highly-performance storage nodes. The rest (running Longhorn) are bottlenecked by various other factors. For these, I’m considering switching to something like the Geekworm X1004 since:
- having an extra disk might improve Longhorn performance. I’ll be able to use a dedicated disk for the OS and another, dedicated disk for Longhorn which supposedly makes it faster (not validated yet)
- having a separate disk for the OS makes things easier to manage
- the X1004 replicates the GPIO, which the 52Pi N04 doesn’t do and might be limiting in the future
Keep in mind that these HAT options made sense for me but might not make sense for your build. In that case, the list above should be a fairly good starting point to discover what suits your individual needs best.
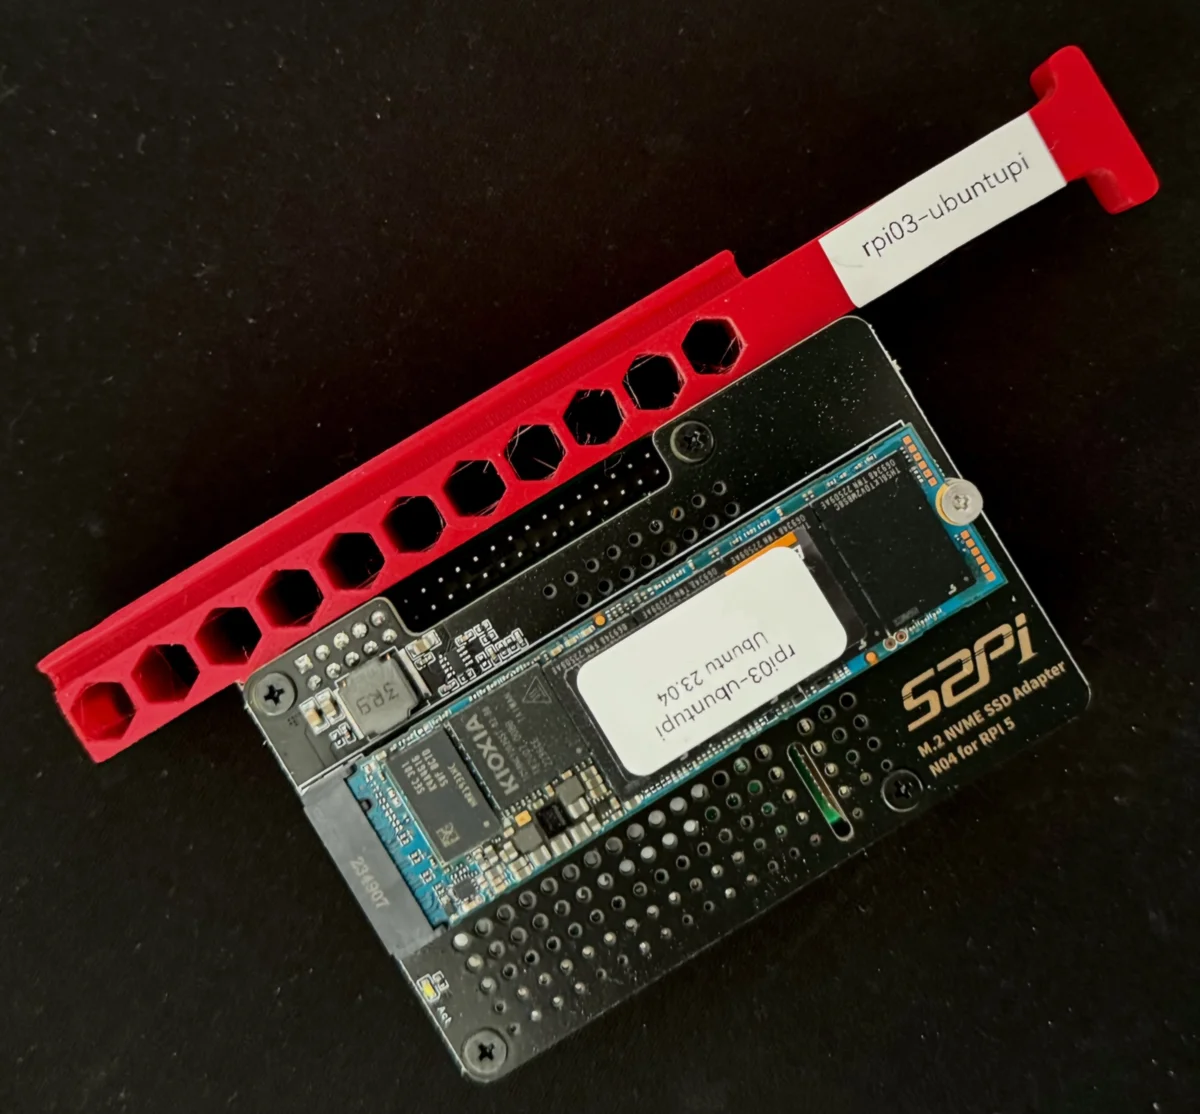
N04 node
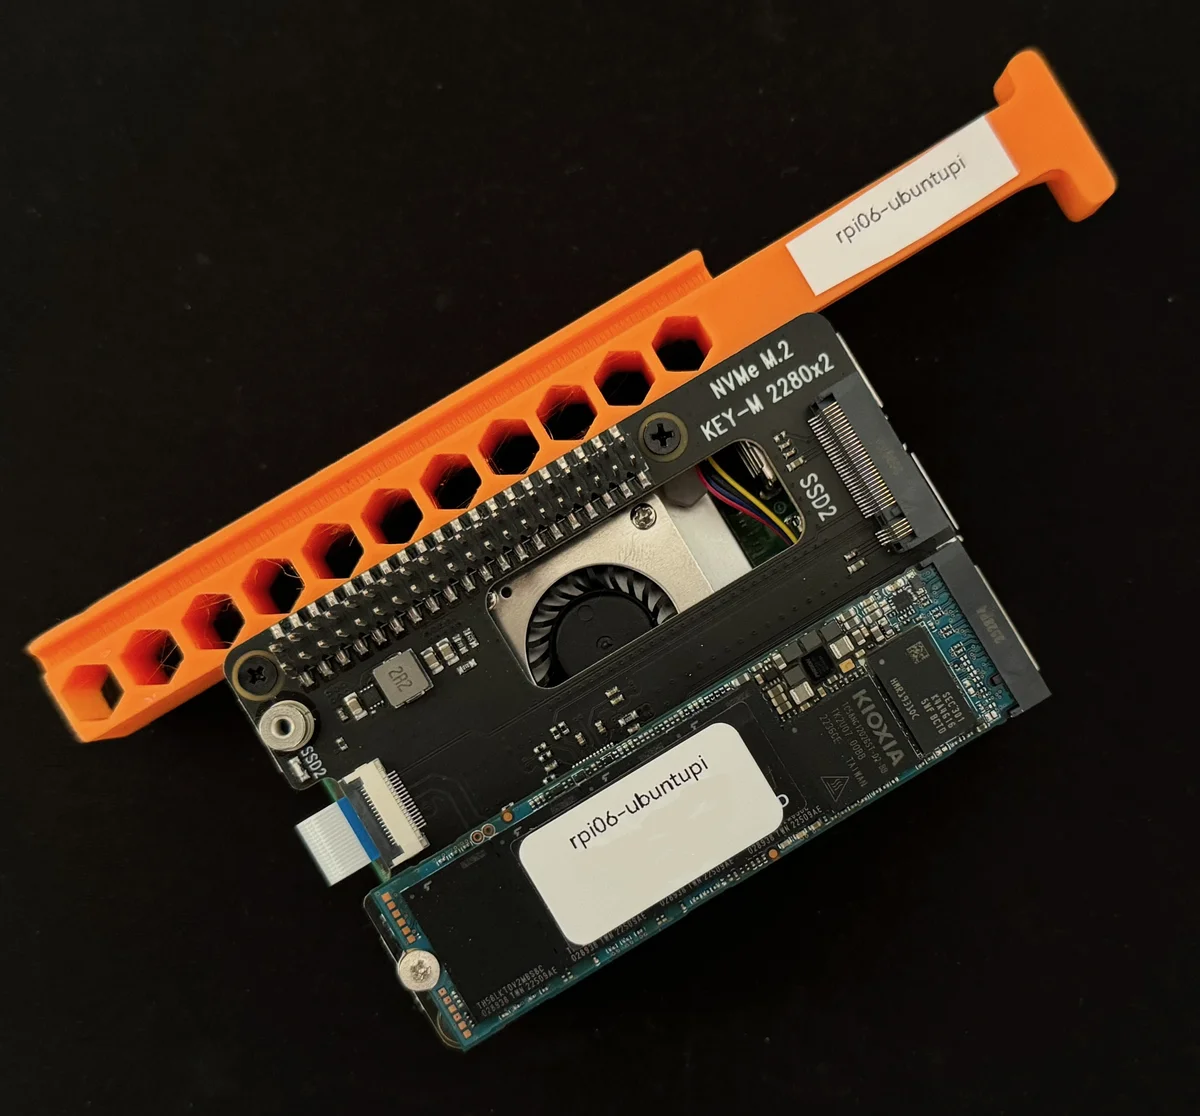
X1004 node
NVMe drives
Some NVMe HATs (like the Pimoroni HAT) offer a list of pre-tested & approved models for NVMe drives. Neither of the ones I used above do, but I’ve been using this KIOXIA Exceria 500GB drive without any issues. Performance is fine, and it’s quite budget friendly too.
Thermals
To begin with, we’ll use the Pis official cooler to cool our nodes. While this is not enough if we have a lot of nodes stacked together, it lets us operate within acceptable temperatures. Using just that, in a vertically mounted rack configuration and a pretty low-usage scenario, my Pis average on 50°C.
While not bad, at some point I decided to experiment with some case fans and saw a significant temperature drop around 15 degrees. So this is something worth considering, especially if you want to keep your cluster utilization high.
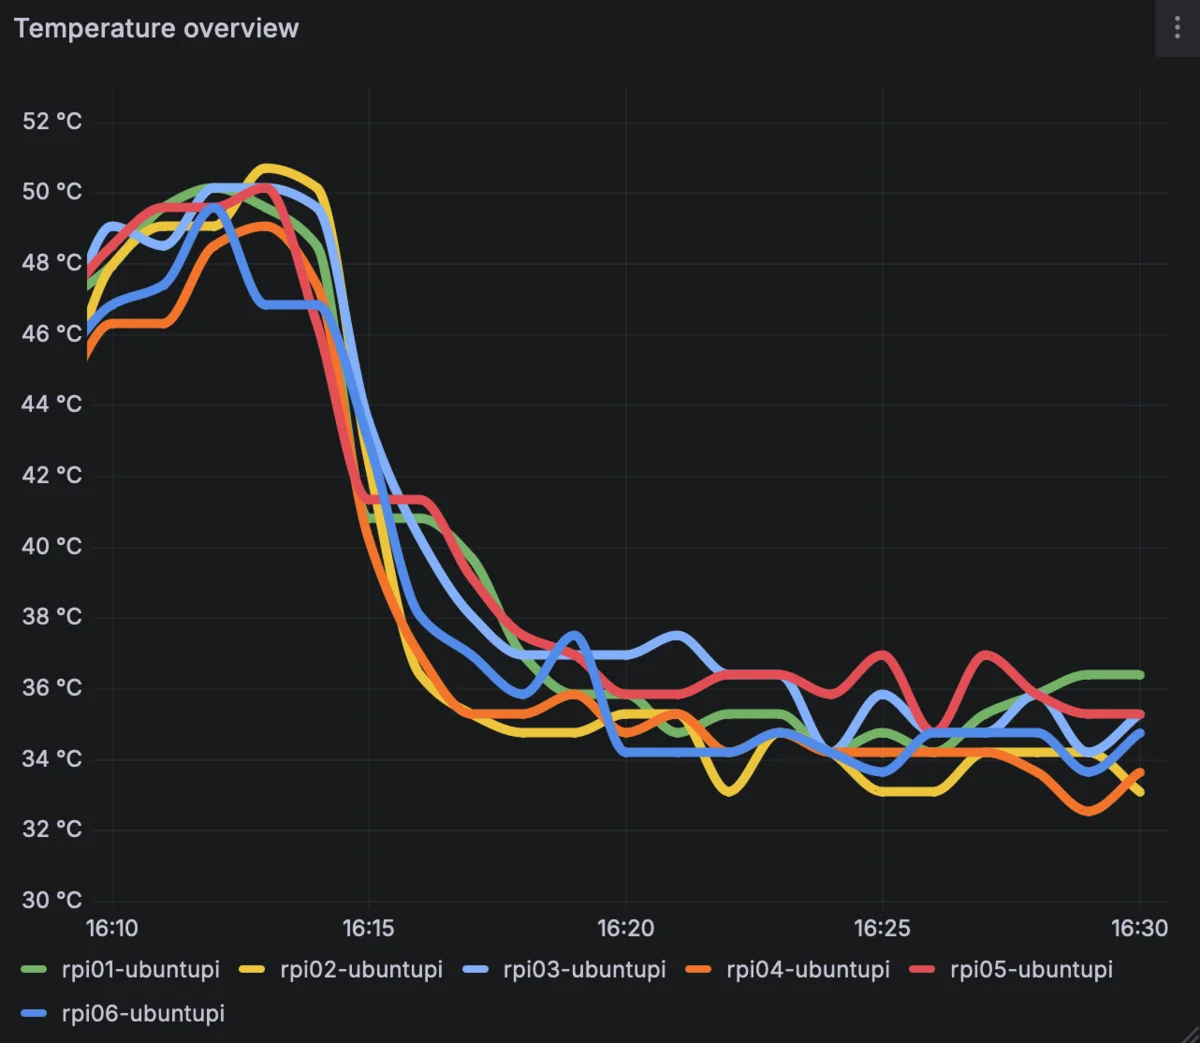
Temperature comparison without / with case fans
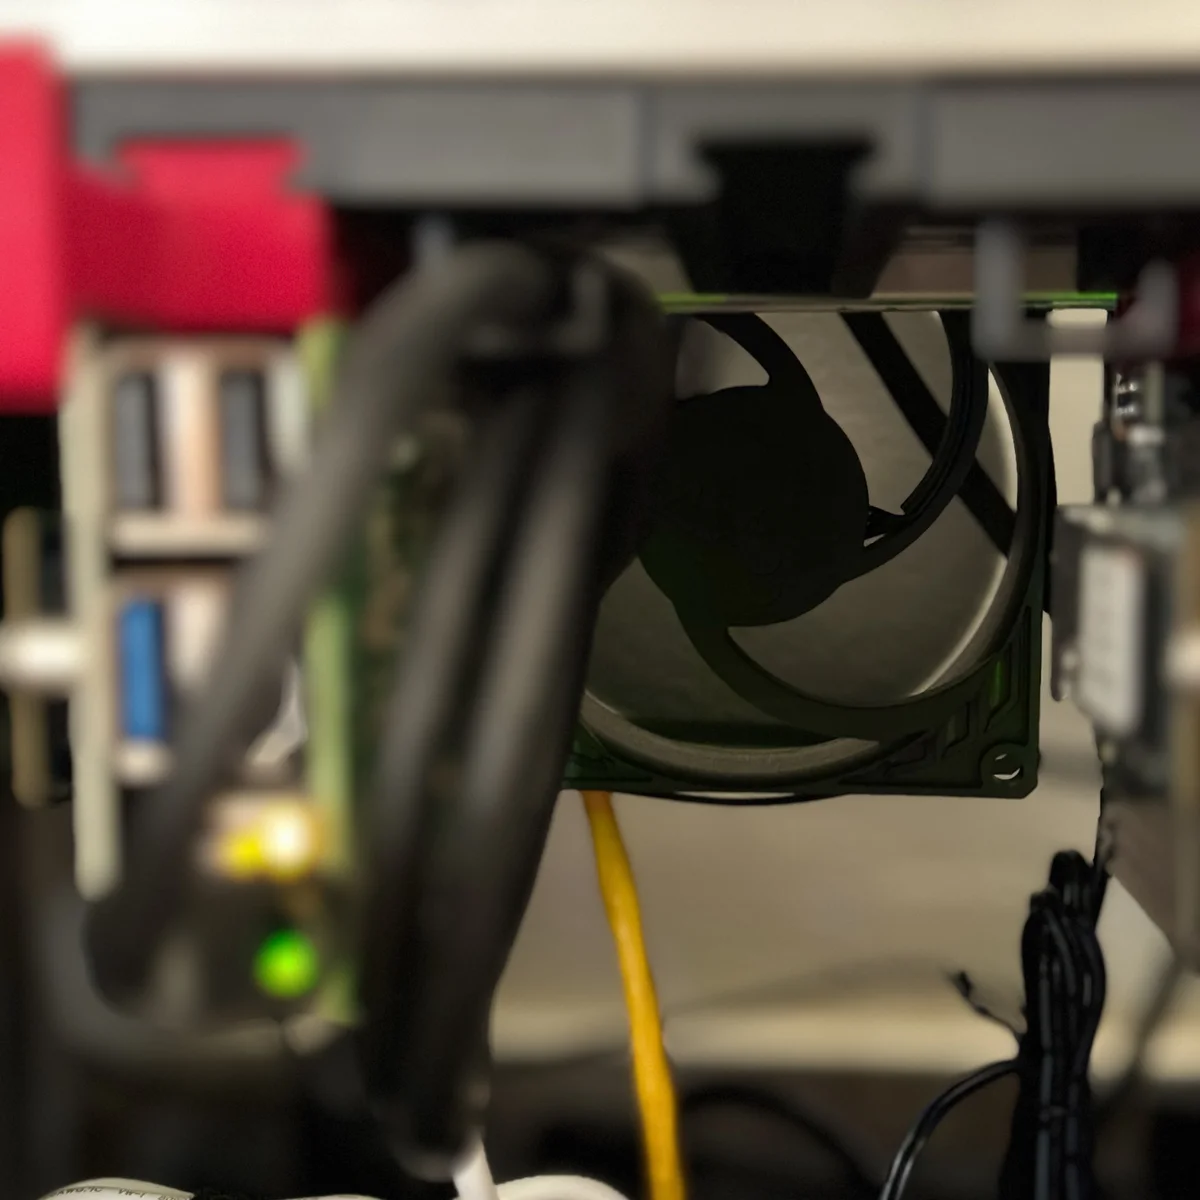
Case fan mounting option
Networking
I’m assuming that most people playing around with this will not have a very advanced home network setup. I most certainly didn’t, and faced a number of issues along the way because of it so we’ll explore them here as we go along, making little to no assumptions about your network setup and its capabilities.
To avoid discouraging anyone, I’ll share that when I first started building the cluster, I was only using my ISP’s modem / router for networking. I was using WiFi (the Pis have onboard WiFi controllers) and everything pretty much worked. I did transition to a Mikrotik CCR-2004-16G-2S+PC somewhere along the line and it did make a difference in management, but it was in no way required to do so.
Here’s roughly what you need to keep in mind:
- it’s really important for Kubernetes to provide static IPs to the nodes. Dynamic IPs can cause issues, so we need to ensure each node is configured with a static IP that’s outside your DHCP server’s range.
- it’s best to avoid using WiFi. Ethernet is much more stable and definitely more performant.
- if you opt for ethernet, you’ll also need at least an 8-port (or smaller even) switch. You can get a pretty cheap one, we don’t need any special features, any unmanaged switch will do.
Cluster node configuration / constraints
When building a Kubernetes cluster there are not really any very specific hardware restrictions. Apart from some vary basic CPU / memory requirements, one can build a cluster on top of beefy servers, in a single machine (by creating VMs with an OS like ProxMox) or even inside a docker container.
However, to make the most out of this experiment, I decided to add some limitations.
- I want to have more than one nodes
- this gives me the opportunity to experiment with high availability and see how the apps I deploy function when e.g. a node suddenly becomes unavailable.
- I would like my cluster to have persistent storage
- most applications require some sort of persistence. I wouldn’t like to build a cluster that can’t support a single database workflow.
- my storage needs to be as reliable and as performant as possible (I’ll explain more on this in a later post).
- Ideally, I’d like to be able to remove some nodes without the cluster losing basic functionality
- e.g. given that I don’t have another Linux machine, being able to remove one node, swap the disk (or add an SD card) and have a Linux machine available for experimentation is pretty useful.
- if a Pi (or a disk) fails, I shouldn’t lose any functionality in the cluster (or data).
- I want to run meaninful workflows on the cluster
- this means we’ll need as high-powered CPUs as we can find on the Pis, but also we’ll need the biggest available memory configuration (meaning, we’ll need RPi 5s, the 8GB versions).
Now, a big factor that shapes the node configuration are the constraints imposed by storage. After looking into my options for storage, the most prominent choices seemed to be two (both provided by Rancher):
- Longhorn
- Highly available, cloud native storage. Pods can mount PVs that are not necessarily on the same node. Optimal for workloads that can move around nodes or workloads with replicas on different nodes that need to mount the same PV.
- Sadly, in our setup it was pretty slow (we’ll talk more about why in the storage post).
- Longhorn needs at least 3 physical nodes to guarantee data availability.
- Local-path provisioner
- Local storage, meaning the PV needs to be on the same node with the pod(s) using it.
- Very fast (especially when using a fast disk).
Highly available, fast storage version (HA)
The Kubernetes control plane & Longhorn both need at least 3 nodes to provide high availability.
So, to build a highly available (HA) cluster, we end up with:
- 3 control plane nodes (not necessarily dedicated)
- 4 Longhorn nodes (3 as a minimum + 1 for redundancy)
- 2
local-pathnodes (1 as a minimum + 1 for redundancy)
If we don’t need the control plane nodes to be dedicated and can afford reusing them as storage nodes as well, (I don’t see a reason not to do that), then we can achieve all of the above with a 6 node cluster.
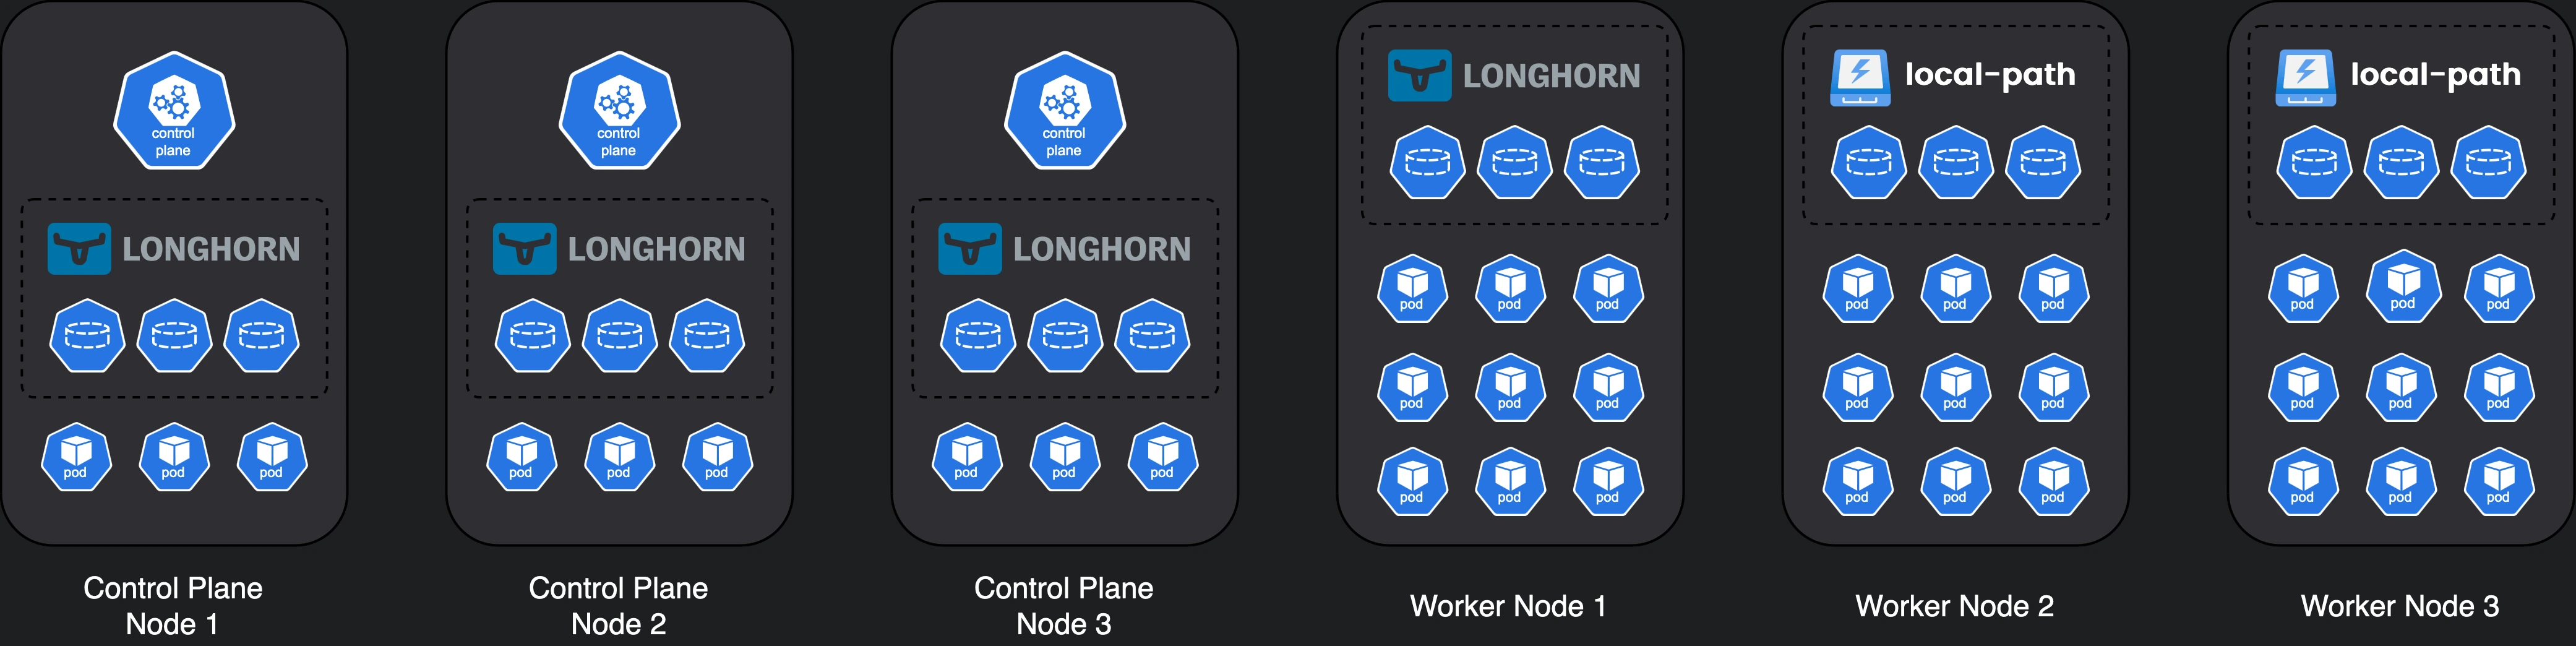
Our HA cluster
One design choice I made was separating Longhorn & local-path storage into separate nodes. There’s no strict requirement to do that, you can have both in the same node and use different paths / partitions. However, you’d need larger disks to do that and it might get more complex to manage.
Other variations
While this version offers high availability, it obviously comes with a larger hardware cost. Let’s also explore a few lighter variations:
- if we don’t need to casually remove nodes from the cluster, we can remove 2 nodes which leaves us with 4 nodes.
- if we also don’t need to have
local-pathstorage, we can remove another node.- or you could even add
local-pathstorage and Longhorn storage in the same node.
- or you could even add
- if we don’t care about having a highly available control plane, we can only run it in 1 node, although if we care about fault-tolerant Longhorn storage we need 3 nodes anyway.
- if, now, we don’t care about fault-tolerant Longhorn or control plane high availability, we can have just a 2 node cluster. But this is not really recommended, since a disk failure would most likely cause data loss.
Variation #2 offers high availability (and highly performant storage if you install both Longhorn and local-path) but limits the capacity of our cluster for meaningful workloads since all nodes run the control plane and worker pods as well.
Variation #3 gives the cluster some breathing room, trading availability for worker capacity.
Variation #4 is the most budget friendly option we can have while still being able to experiment with storage workflows.

Variation 1 doesn’t sacrifice anything apart from the ability to remove nodes.
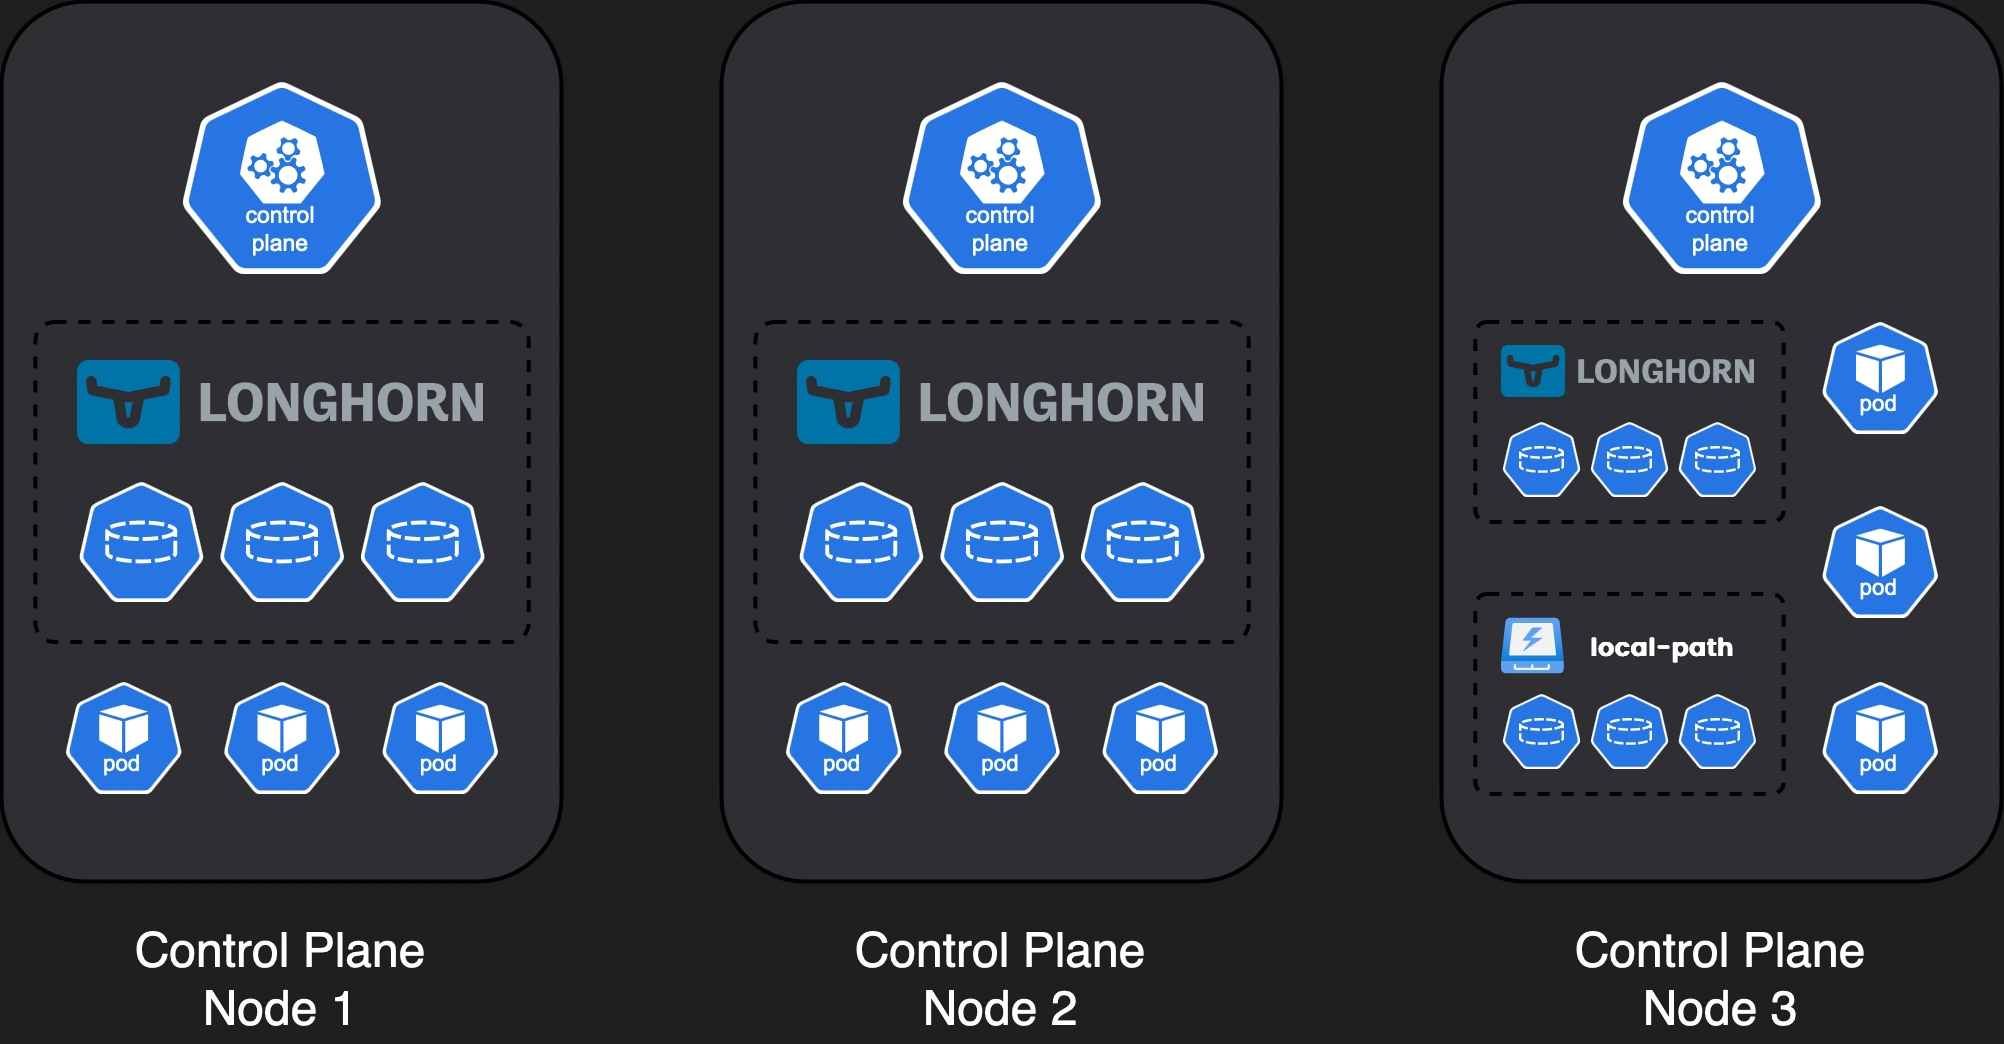
Variation 2 sacrifices the capacity of the worker nodes, since there are no dedicated workers.
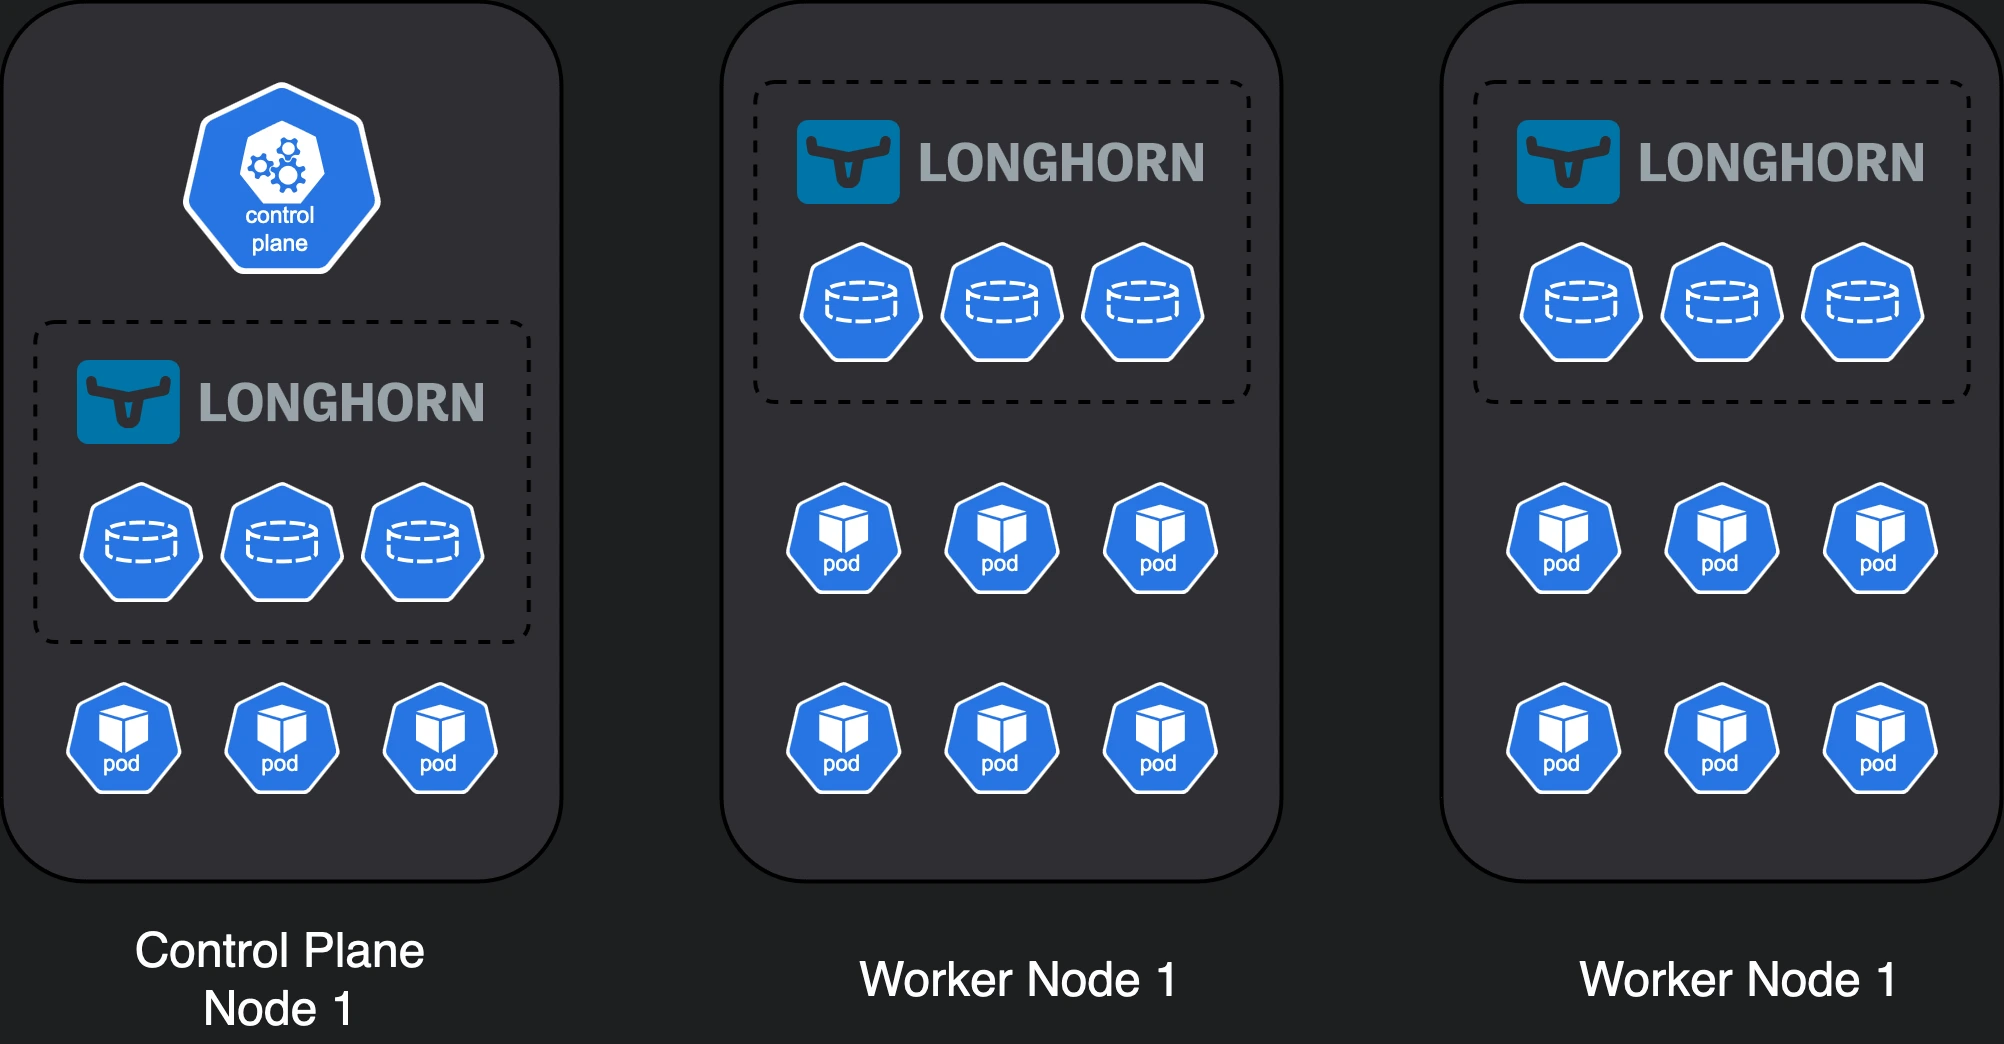
Variation 3 trades high availability for increased worker capacity.
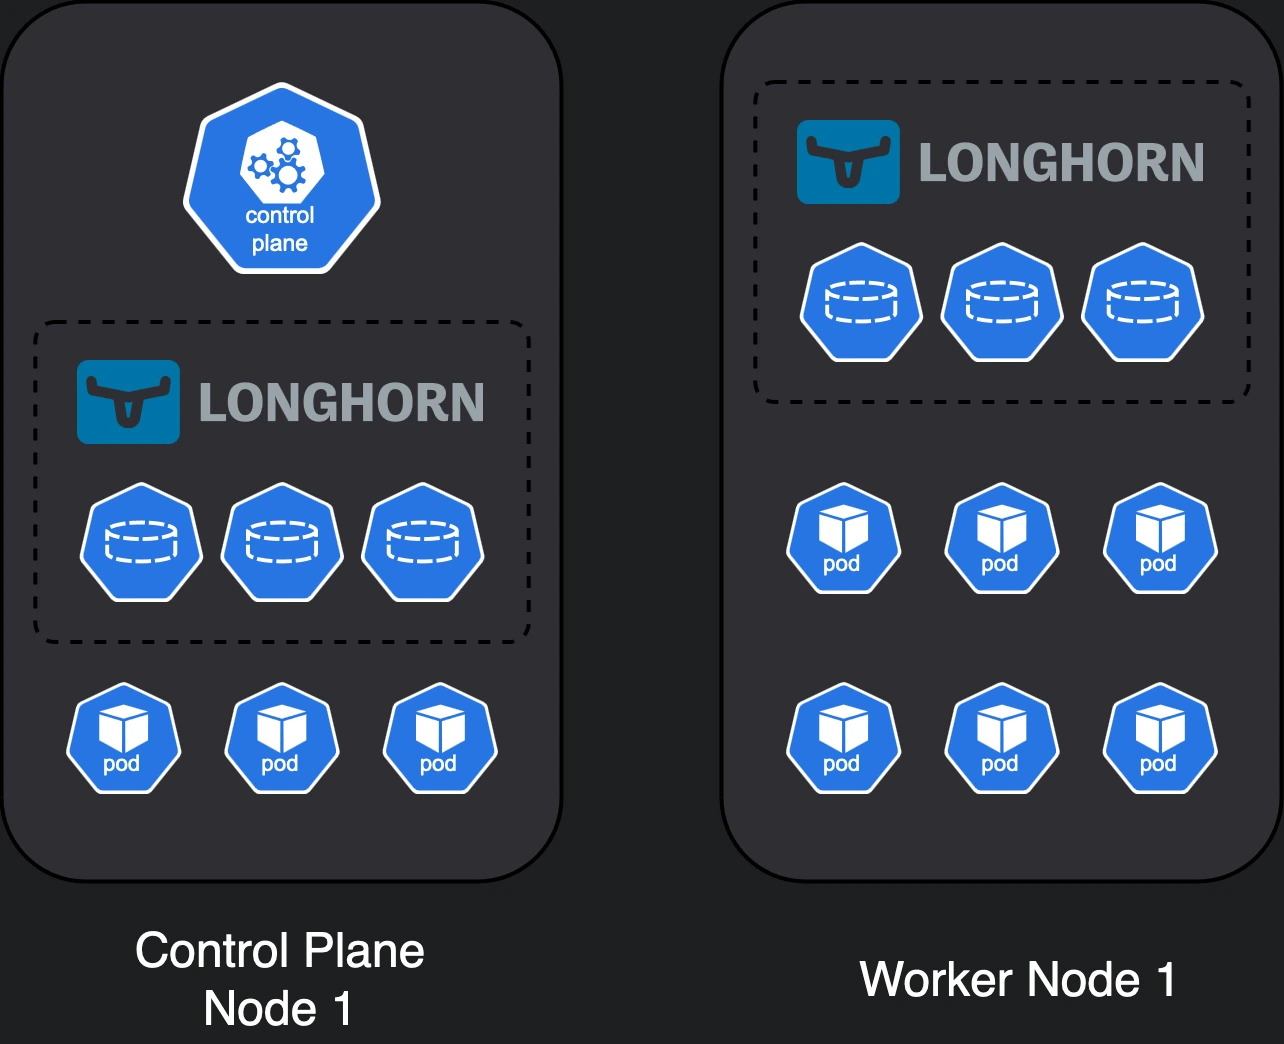
Variation 4 is pretty budget friendly, although quite limited.
Cost breakdown
Keeping in mind all of the above, let’s do a summary of the costs we’ve identified so far and see how much each node will cost. I’ll use amazon.de links to have a common point of reference, but in my case local vendors were much cheaper for quite a few of these parts.
| Component | Cost |
|---|---|
| Raspberry Pi 5 8GB | 95€ |
| Official PSU | 15€ |
| Official Active Cooler | 8€ |
| N04 NVMe HAT | 14€ |
| KIOXIA Exceria NVMe 500 GB | 40€ |
| Total | 172€ |
These prices include VAT and components purchased locally were at least 10% cheaper. But this is a high-level estimate on how much a single node should cost.
That puts our 6 node cluster close to 1.000€ total, or a more humble, 4-node cluster close to 700€. While that might seem high, keep in mind that a 2-node cluster, an extremely limited managed database and a load balancer on the cheapest provider out there (Digital Ocean) costs around 700€/year.
So if you’re in this for the long run, it’s definitely worth it.
Concluding
Hopefully by now you’ll know:
- what components to purchase
- how to architect your cluster (and why)
- an overview of the cost required for this effort
In the next post, I’ll explain how to bootstrap the nodes, install the required utilities & configure them to install Kubernetes. Don’t forget to subscribe below to get updates about next posts.
Also, if you’re building this, I’d love to hear your thoughts and any questions you might have. Feel free to drop a comment below or reach out to me on my socials.
See you soon 👋!